


After seeing the desk organizer pictured below for $90 on a popular member-only shopping site, and then again on a office supply site for $40, I knew I could make my own for $0! I used old boxes that we normally throw away and craft supplies that I already had on hand. I hope you will be inspired to look at your garbage a second time and see what you can create!
 |
| Photo source: Biggestbook.com |
Supplies Used:
various boxes rescued from file 13 (use whatever you have on hand!)
Craft Paint
Hot Glue
Craft sticks or Popsicle sticks (2)
Mod Podge
Scrapbook papers
utility knife
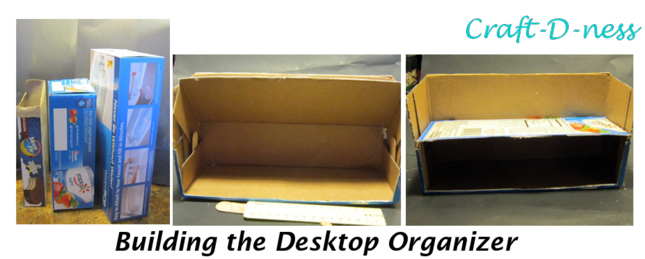
I hot glued each section in place as I worked on the organizer which adds to its stability.
Next, I used a Moon Pie snack box to create the little cubby on the bottom left. I opted to omit the drawer as seen on the inspiration organizer.

Finally, I cut the end off of a Water Bob box and placed it in the upper right corner, to create my first storage section. I added another portion of the Moon Pie box to divide the upper right portion into a smaller section.
Once the desk organizer was assembled, I painted it black. The next step was adding to scrapbook paper to the facade using Mod Podge. It still seemed plain to me so I cut out inspiring words from scrapbook paper and added them in graffiti style.
I added one final coat of Mod Podge over everything. I could hardly wait for it to dry to load it up and start using it!

Fun and rewarding project! Do you like to reuse, repurpose and recycle? Not sure? Check out my REcycle, REuse, REpurpose Pinterest board.


Parties I'm going to... Live Laugh Rowe, I Gotta Create, Glued To My Crafts, Mostly Homemade Mom, Turning The Clock Back, The SITS Girls, Cupcakes & Crinoline, Homework, A Peek Into My Paradise,
Moonlight & Mason Jars, One More Time Events,
Follow Craft-D-ness
Moonlight & Mason Jars, One More Time Events,
Follow Craft-D-ness
If you prefer, you may want to subscribe via Email:

No comments:
Post a Comment